
ADVERTISEMENT
ADVERTISEMENT
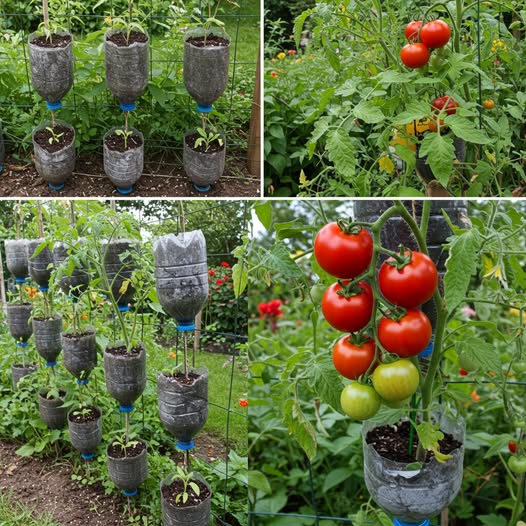
How to Grow Tomatoes Hanging in Plastic Bottles – No Garden Needed
Tomato seedlings (preferably dwarf or cherry varieties)
Potting mix (well-draining)
Small piece of sponge, cloth, or coconut coir
String or sturdy wire for hanging
Scissors or a craft knife
Watering can
Step-by-Step Guide to Hanging Bottle Gardening
1. Prepare the Plastic Bottle
Start with a clean, dry plastic bottle. Remove the label so sunlight can reach the soil.
Instructions:
Cut off the bottom of the bottle (about 2–3 inches from the base).
Poke or drill two small holes near the cut edge to attach string or wire for hanging.
Remove the bottle cap and insert a sponge, piece of cloth, or coir into the bottle neck. This keeps the soil from falling out and supports the plant stem.
2. Insert the Tomato Seedling
Gently pass the root ball of the seedling through the bottle opening so that the leafy part sticks out of the bottle neck.
Tip: Use young, flexible seedlings so you don’t damage the stem.
Support the root system inside the bottle with your hand, and carefully fill the container with potting mix. Press gently to ensure the seedling stays in place.
3. Use a Rich Potting Mix
Tomatoes are heavy feeders, so use a nutrient-rich, well-draining mix.
Recommended mix:
40% garden soil or compost
30% cocopeat or peat moss
20% vermicompost or aged manure
10% sand or perlite for aeration
This ensures the tomato plant gets enough nutrients and the soil doesn’t compact or hold excess water.
4. Hang the Bottle in a Sunny Location
Tomatoes need at least 6–8 hours of sunlight per day. Hang your bottle planter where it gets good exposure—such as a balcony railing, sunny wall, or even a window grill.
Use strong twine, rope, or metal wire to hang the bottle securely. The plant will grow downward, reducing the need for a stake or trellis.
5. Watering and Maintenance
Regular watering is essential since hanging bottles can dry out faster than ground soil.
Tips:
Water through the open bottom (now the top of the bottle) using a small can.
Check moisture daily—avoid overwatering, but don’t let the soil dry out.
Add mulch (like dry leaves or coco husk) at the top to retain moisture.
Once a week, feed the plant with a diluted organic fertilizer, such as compost tea or banana peel liquid, to encourage flowering and fruit development.
6. Pruning and Flower Support
To help the plant focus its energy on fruit production:
Remove the lower leaves that yellow or droop.
Pinch off side shoots or “suckers” that appear in leaf joints to keep the plant compact.
Gently tie small supports around developing fruit clusters if needed, especially in windy areas.
Choosing the Right Tomato Variety
While you can try this method with almost any type of tomato, compact or cherry varieties work best because they don’t grow too large or heavy. Some excellent options include:
Tiny Tim
Micro Tom
Patio Princess
Red Robin
Tumbling Tom
These varieties are bred specifically for small spaces and produce well in containers.
Benefits of This Method
Space-saving: Ideal for balconies, windows, and tight spaces.
Recyclable: Reuses plastic bottles that would otherwise go to waste.
Portable: Easy to move or adjust depending on light and weather.
Clean and efficient: Reduces the chance of pests and soil-borne disease.
Satisfying: Enjoy homegrown tomatoes even in an apartment.
Final Thoughts
Growing tomatoes in hanging plastic bottles is an innovative way to garden without the need for land. With basic materials, sunlight, and a little care, you can grow vibrant tomato plants that yield sweet, juicy fruits—right from your wall or window. It’s proof that anyone can be a gardener, regardless of space.
Give this method a try, and enjoy the satisfaction of harvesting tomatoes from a plant you nurtured yourself—no garden required.
ADVERTISEMENT
